Use Keikai JSP Tag
Overview
In this section, we will demonstrate how you can make an HTML element, e.g. a button, to interact with Keikai spreadsheet in a JSP using AJAX with an example. The following section requires you to know basic JS & jQuery.
Request For Leave Example
Assume we have to build a Request For Leave application. A user fills in the required fields of a “Request For Leave” form and click “Submit” button to submit his request. Or he can clicks “Reset” button to reset what he inputs to empty. The screenshot below shows a request of a user “John”:
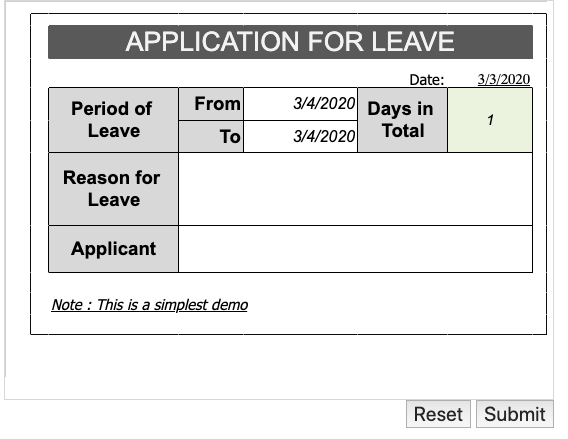
The application form is created using Keikai Spreadsheet and the two buttons (Reset and Submit) are just ordinary HTML buttons in a JSP page.
Using Spreadsheet Tag
Using Spreadsheet JSP tag is like using any other JSP custom tag
library. You have to declare a tag library with <%@taglib %> first and
write Spreadsheet JSP tag with a specified prefix.
1
2
3
4
5
6
7
8
9
10
11
12
13
14
15
16
17
18
19
20
<%@page language="java" contentType="text/html; charset=UTF-8"
    pageEncoding="UTF-8"%>
<%@taglib prefix="kkjsp" uri="http://www.zkoss.org/jsp/zss"%> http://www.zkoss.org/jsp/zss"%>
<!DOCTYPE html>
<html>
    <head>
        <meta http-equiv="Content-Type" content="text/html; charset=UTF-8"/>
        <title>Application for Leave</title>
        <kkjsp:head/>
    </head>
<body>
    <div>
        <kkjsp:spreadsheet id="myzss"
            bookProvider="io.keikai.jspdemo.DemoBookProvider"
            width="800px" height="500px"
            maxrows="100" maxcolumns="20"
            showToolbar="true" showFormulabar="true" showContextMenu="true"/>
    </div>
    ...
</body>
- Line 3, 10: Basic steps to use spreadsheet JSP tag.
- Line 15: A special attribute of spreadsheet JSP tag which should be specified with a book provider class name, and we will explain it later.
- Line 16~18: For component attributes, refer to Control Components.
Tag attributes
JSP tag supports the same attributes as zul tag, please see Control Components.
Book Provider
The bookProvider attribute in app4l.jsp contains a book provider class named
io.keikai.jspdemo.DemoBookProvider. The class implements an
interface io.keikai.jsp.BookProvider which
is used to load a book model programmatically in JSP.
This provider is called when creating a Spreadsheet in ZK context. The returned book model will be set to a Spreadsheet.
public class DemoBookProvider implements BookProvider{

    public Book loadBook(ServletContext servletContext, HttpServletRequest request, HttpServletResponse res) {

        Book book;
        try {
            URL bookUrl = servletContext.getResource("/WEB-INF/books/application_for_leave.xlsx");
            book = Importers.getImporter().imports(bookUrl, "app4leave");
        } catch (Exception e) {
            e.printStackTrace();
            return null;
        }

        //initialize the book model
        ...
        return book;
    }
}
Interaction between JSP and Spreadsheet
We rely on 2 helper objects to communicate between a browser and a server:
kkjsp (browser) <—> SmartUpdateBridge (server)
kkjspis a JavaScript object defined by Keikai widget. You don’t need to declare to use it. It provides client-side context information forSmartUpdateBridgeto process a request correctly.SmartUpdateBridgeis a Java object provided Keikai. You need to use it to generate a Keikai response that contains updates for aBookmodel. Thekkjspwill read the response and render the change in your browser.
The sequence diagram displays the overall handling process of an AJAX
request when a user clicks a button in app4l.jsp.
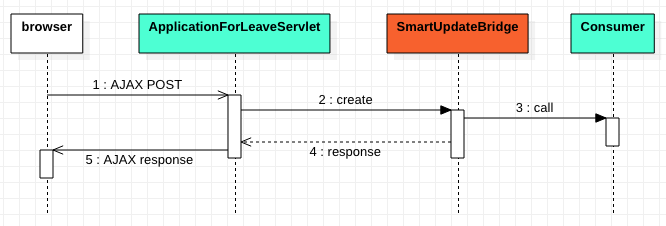
- The
app4l.jspis the main page with the form for leave. - The
ApplicationForLeaveServletis a servlet we implement to handle AJAX requests fromapp4l.jsp.
- When clicking a button, a browser sends an AJAX request with Keikai widget information and application related data to
ApplicationForLeaveServlet. - The servlet extracts necessary parameters to create
SmartUpdateBridge. SmartUpdateBridgecalls a Consumer function that we implement to do the business logic e.g. reset fields. Then it generates Keikai response in aMap.- Convert the response Map to
JSONObject. kkjspprocesses the keikai response and render the server-side change in a browser.
Send an AJAX Request
When a user clicks a button, it sends an AJAX request to Reset/Submit the form.
Register onClick listener
First, we have to bind event listeners on Reset and Submit buttons with jQuery. Since ZK framework already bundles jQuery, we don’t have to include jQuery’s JavaScript library again.
//ZK has a bundled jQuery
$(document).ready(function(){
    //register client event on button by jquery api
    $("#submit").click(function(){
        postAjax("submit");
    });
    $("#reset").click(function(){
        postAjax("reset");
    });
});
postAjax() is a helper function to send AJAX request to my server.
postAjax()
1
2
3
4
5
6
7
8
9
10
11
12
13
14
15
16
17
18
//kkjsp is created by keikai
function postAjax(action) {
	//use window.fetch() API
	//app4l is the servlet URL
	fetch("app4l", {
		headers: {
			'Content-Type': 'application/json',
		},
		method: 'POST',
		// 'myzss' is the id specified on kkjsp tag
		body: JSON.stringify(kkjsp.prepare('myzss', {action: action})) // preparing Keikai's request data
	})
    .then(function (response) {
        return response.json();
    })
    .then(kkjsp.process) // render change generated by SmartUpdateBridge
    .then(handleAjaxResult); //optional post-processing
}
Handle AJAX Request and Response
The ApplicationForLeaveServlet is a servlet we implement to handle AJAX requests sent from a browser. It extracts necessary parameters from AJAX request to
create SmartUpdateBridge object and pass a Consumer function to withBook() to implement our business logic.
public class ApplicationForLeaveServlet extends HttpServlet{

	@Override
	protected void doPost(HttpServletRequest req, HttpServletResponse resp)
			throws IOException {
		// parsing fetch API with request body data to JSON Map
		Map<String, String> bodyData = (Map) JSONValue.parse(req.getReader().lines().collect(Collectors.joining()));

		final String action = bodyData.get(ACTION);

		// add custom response message, it depends on your logic.
		final JSONObject appResponse = new JSONObject();
		appResponse.put(ACTION, action);

		final Map keikaiResponse = SmartUpdateBridge.Builder.create(req.getServletContext(), req, resp, bodyData).withBook(book -> {
			//implement business logic
			Sheet sheet = book.getSheetAt(0);
			if("reset".equals(action)){
				reset(sheet);
			}else if("submit".equals(action)){
				submit(sheet, appResponse);
			}
		})
		// build a keikai response for Book change which will be processed by kkjsp
		.build(appResponse);

		resp.getWriter().append(JSONObject.toJSONString(keikaiResponse));
	}
}
Manipulate Book Model
Inside the Consumer function passed to withBook(), you can use those APIs we mentioned
in Manipulating Book Model
to implement your business logic. In our example, we use io.keikai.api.Range to set cell
edit text and get a value from the cells.
Reset
The method reset() implements the business logic to clear user
input back to default value.
public class ApplicationForLeaveServlet extends HttpServlet{
...
    //reset cells to default value
    private void reset(Sheet sheet) {
        final String dateFormat =  "yyyy/MM/dd";
        //you can use a cell reference to get a range
        Range from = Ranges.range(sheet,"E5");//Ranges.range(sheet,"From");
        //or you can use a name to get a range (the named range has to be set in Excel);
        from.setCellEditText(DateUtil.tomorrow(0,dateFormat));

        //set other cells...
    }
Submit
The submit() validates user input and returns a data for form element to submit in the browser. You can check full source code.
1
2
3
4
5
6
7
8
9
10
11
12
13
14
15
16
17
18
19
20
21
22
23
24
25
26
27
28
29
30
31
32
33
34
35
36
37
38
39
40
//validate cell data of user input and return a JSONObject
private void submit(Sheet sheet, JSONObject response) {
    Date from = Ranges.rangeByName(sheet,"From").getCellData().getDateValue();
    Date to = Ranges.rangeByName(sheet,"To").getCellData().getDateValue();
    String reason = Ranges.rangeByName(sheet,"Reason").getCellData().getStringValue();
    Double total = Ranges.rangeByName(sheet,"Total").getCellData().getDoubleValue();
    String applicant = Ranges.rangeByName(sheet,"Applicant").getCellData().getStringValue();
    Date requestDate = Ranges.rangeByName(sheet,"RequestDate").getCellData().getDateValue();

    if(from == null){
        response.put("message", "FROM is not a correct date");
    }else if(to == null){
        response.put("message", "TO is not a correct date");
    }else if(total==null || total.intValue()<0){
        response.put("message", "TOTAL small than 1");
    }else if(reason == null){
        response.put("message", "REASON is empty");
    }else if(applicant == null){
        response.put("message", "APPLICANT is empty");
    }else if(requestDate == null){
        response.put("message", "REQUEST DATE is empty");
    }else{
        //Option 1:
        //You can handle your business logic here and return a final result for users directly
        //Or option 2: return necessary form data,
        //so client can process it by submitting that can be handled by Spring MVC or Struts
        response.put("valid", true);
        JSONObject form = new JSONObject();
        response.put("form", form);

        form.put("from", from.getTime());//can't pass as data, use long for time
        form.put("to", to.getTime());//can't pass as data, use long for time
        form.put("reason", reason);
        form.put("total", total.intValue());//we just need int
        form.put("applicant", applicant);
        form.put("requestDate", requestDate.getTime());

        ...
    }
}
- Line 11: The
responseis a JSONObject that will be sent back to the client. You can put any data you like according to your business requirement because you can get it inapp4l.jspand handle it by yourself. In our case, we put a validation message in order and show it with Javascript. - Line 27: You can handle your business logic here and return a final result for users directly.
- Line 29: Here we return data for form element, and we submit a form at a browser in JavaScript.
Process AJAX Response
Previously, we pass the handleAjaxResult() when sending a request. See Send an AJAX Request.
/** handle the custom response created in the servlet. (not generated by SmartUpdateBridge)
*/
function handleAjaxResult(result){
	//show input validation message
	if(result.message){
		alert(result.message);
	};

	//handle your ajax response in your way
	if(result.action == "submit" && result.valid){
		if(result.form){
			//create a form dynamically to submit the form data
			var field,form = jq("<form action='submitted.jsp' method='post'/>").appendTo('body');
			for(var nm in result.form){
				field = jq("<input type='hidden' name='"+nm+"' />").appendTo(form);
				field.val(result.form[nm]);
			}
			form.submit();
		}
	};
}