Rich Text Edit
Spreadsheet allow users to edit cell text with rich text format, it provides a built-in WYSIWYG (“what you see is what you get”) editor to help users enter and format text. Users can also set rich text via Spreadsheet’s API as well.
Edit Rich Text within WYSIWYG Editor
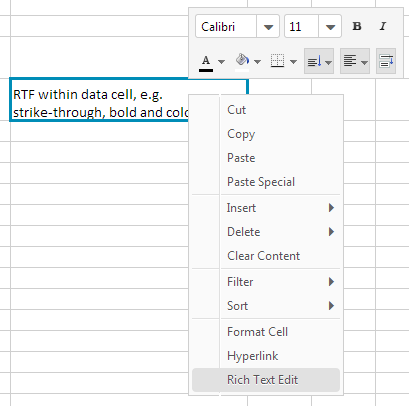
Using WYSIWYG editor is easy, simply right click on the cell to open context menu and click “Rich Text Edit”.

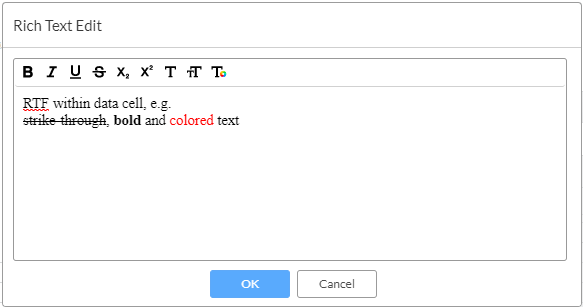
Then you can edit in rich text within WYSIWYG editor

The result:

Set Rich Text via API
io.keikai.Range API allows
you to get or set rich text in HTML format of a cell:
1
2
3
public void setCellRichText(String html);

public String getCellRichText();
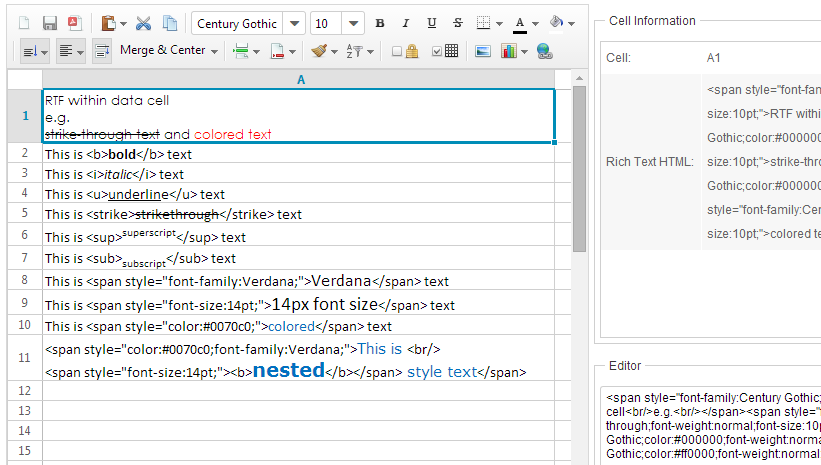
For example, the screenshot below is an application which can display a focused cell’s data and the editor on the right bottom corner allows you to change the focused cell’s rich text.

When we focus on A1, we can see the cell’s Rich Text HTML, we can then change the text and see the update.
Example application’s ZUL page
1
2
3
4
5
6
7
8
9
10
11
12
13
14
15
16
17
18
19
20
21
22
23
24
25
26
27
28
29
30
31
    <window hflex="1" vflex="1"
        apply="io.keikaial.RichTextEditComposer">
        <hlayout hflex="1" vflex="1">
            <spreadsheet id="ss" hflex="1" vflex="1" src="/WEB-INF/books/richTextEdit.xlsx"
                showContextMenu="true" showToolbar="true"
                maxVisibleRows="100" maxVisibleColumns="40" />
            <vlayout width="600px" vflex="1">
                <groupbox hflex="1" vflex="1">
                    <caption label="Cell Information" />
                    <grid vflex="1" hflex="1">
                        <columns>
                            <column width="100px"/>
                            <column/>
                        </columns>
                        <rows>
                            <row>
                                Cell: <label id="cellRef"/>
                            </row>
                            <row>
                                Rich Text HTML: <label id="cellRichText"/>
                            </row>
                        </rows>
                    </grid>
                </groupbox>
                <groupbox hflex="1" vflex="1">
                        <caption label="Editor" />
                            <textbox id="cellEditTextBox" hflex="1" rows="10" vflex="1"/>
                    </groupbox>
            </vlayout>
        </hlayout>
    </window>
Controller
1
2
3
4
5
6
7
8
9
10
11
12
13
14
15
16
17
18
19
20
21
22
23
24
25
26
27
28
29
30
31
32
33
34
35
36
37
38
public class RichTextEditComposer extends SelectorComposer<Component> {
    @Wire
    private Spreadsheet ss;
    @Wire
    private Label cellRef;
    @Wire
    private Label cellRichText;
    @Wire
    private Textbox cellEditTextBox;

    @Listen("onCellFocus = #ss")
    public void onCellFocus(){
        CellRef pos = ss.getCellFocus();

        refreshCellInfo(pos.getRow(),pos.getColumn());
    }

    private void refreshCellInfo(int row, int col){
        Range range = Ranges.range(ss.getSelectedSheet(), row, col);
        final String richText = range.getCellRichText();
        cellRef.setValue(Ranges.getCellRefString(row, col));
        if (richText != null) {
            cellRichText.setValue(richText);
            cellEditTextBox.setValue(richText);
        } else {
            final String editText = range.getCellEditText();
            cellRichText.setValue(editText);
            cellEditTextBox.setValue(editText);
        }
    }

    @Listen("onChange = #cellEditTextBox")
    public void onEditboxChange(){
        CellRef pos = ss.getCellFocus();
        Range range = Ranges.range(ss.getSelectedSheet(),pos.getRow(),pos.getColumn());
        range.setCellRichText(cellEditTextBox.getValue());
    }
}
- Line 20, 22, 26: These code uses API described previously to get the focused cell’s rich text or edit text.
- Line 36: Set edit box’s value back to the focused cell’s rich text when we change the editor box’s text.
Rich Text in HTML Format
Basically, you can use the tag or specify the style to render the text, below is the list of the usage:
- Font: <span style=”font-family: Verdana;”>text</span>
- Font Size: <span style=”font-size: 14pt;”>text</span>
- Bold: <span style=”font-weight: bold”>text</span> or <b>text</b>
- Italic: <span style=”font-style: italic”>text</span> or <i>text</i>
- Underline: <span style=”text-decoration: underline”>text</span> or <u>text</u>
- Strikethrough: <span style=”text-decoration: line-through”>text</span> or <strike>text</strike>
- Superscript: <sup>text</sup>
- Subscript: <sub>text</sub>
- Font Color: <span style=”color: #0070c0”>text</span> or <span style=”color: rgb(0, 112, 192)”>text</span>
It can also be combined like the following:
1
2
3
4
range.setCellRichText("This is a <span style=\"color: #0070c0;\">rich <b>text</b></span>");

range.setCellRichText("<span style=\"color:#0070c0;font-family:Verdana;\">This is <br/>" +
    "<span style=\"font-size:14pt;\"><b>nested</b></span> style text</span>");
Note: you need to use <br/> tag to create a line break.
Because rich text does not support layout, it is not recommended to use <div> or <p> HTML tags, as they would be ignored and a line break would be prepended instead when converted to text.