Selection Event
Overview
The following events involve in changing selected cell range.
onCellFocus
This event is fired when a cell gets focused by mouse clicking or using
key. When a corresponding event listener is invoked, a io.keikai.ui.event.CellEvent
object is passed as an argument.
onCellSelection
This event is fired when a user clicks a cell, or drags a group of
cells. It is also fired if a user selects a row or a
column by clicking their headers to select the whole row (or
column). When the corresponding event listener is invoked, a io.keikai.ui.event.CellSelectionEvent
object is passed as an argument.
onCellSelectionUpdate
This event is fired when a user drags to move cells or drags the fill
handle. When the corresponding event listener is invoked, a
io.keikai.ui.event.CellSelectionUpdateEvent object is passed as an argument.
There are two features, “auto fill” and “move cell content”, depend on this event. They listen to the event and perform corresponding actions like filling cells. Notice that your event listener might affect these features.
Event Monitor Example
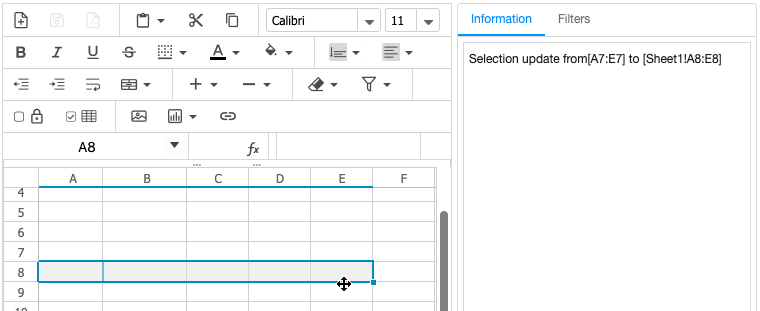
In our Event Monitor application, you can see that the mouse pointer becomes a 4-direction arrow pointer. This means we can move the selection area. Thus, you can see the update selection in the right panel.

The following code demonstrates how to listen above events and get related data from them.
1
2
3
4
5
6
7
8
9
10
11
12
13
14
15
16
17
18
19
20
21
22
23
24
25
26
27
28
29
30
31
32
33
34
35
public class EventsComposer extends SelectorComposer<Component>{
    //omitted codes...

    @Listen("onCellFocus = #ss")
    public void onCellFocus(CellEvent event){
        StringBuilder info = new StringBuilder();
        info.append("Focus on[")
        .append(Ranges.getCellRefString(event.getRow(),event.getColumn())).append("]");

        //show info...
    }

    @Listen("onCellSelection = #ss")
    public void onCellSelection(CellSelectionEvent event){
        StringBuilder info = new StringBuilder();
        info.append("Select on[")
        .append(Ranges.getAreaRefString(event.getSheet(), event.getArea())).append("]");

        //show info...
    }

    @Listen("onCellSelectionUpdate = #ss")
    public void onCellSelectionUpdate(CellSelectionUpdateEvent event){
        StringBuilder info = new StringBuilder();
        info.append("Selection update from[")
        .append(Ranges.getAreaRefString(event.getOrigRow(),event.getOrigColumn()
                , event.getOrigLastRow(),event.getOrigLastColumn()))
        .append("] to [")
        .append(Ranges.getAreaRefString(event.getSheet(), event.getArea())).append("]");

        //show info...
    }


}
- Line 4, 13, 22: Apply
@Listento listen an event with the syntax[EVENT NAME] = [COMPONENT SELECTOR]. All event names can be found inio.keikai.ui.event.Events. The “#ss” is the component selector which refers to the component with idsson the ZUL page. (SelectorComposer supports various selector syntax that let you select components easily. Please refer to ZK Developer Reference). - Line 8: You can get focused cell’s row and column index (0-based).
- Line 17: You can get selection area by
event.getArea(). - Line 26: You can get the selection area before and after it changes.
Range Selection Example
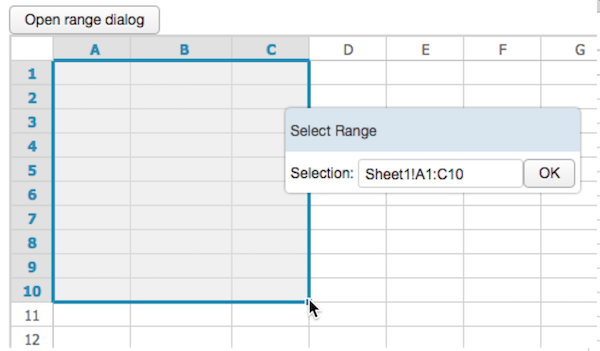
A practical use case of onCellSelection event is to build a range
selection dialog, e.g. let users select a cell range for further
processing without entering it using the keyboard. An example is shown by
the screenshot below:

When opening the dialog to select a range, we can hide editing features and
cancel onStartEditing event to prevent users from editing.
In the code below, we put cell address string converted from
CellSelectionEvent in the Textbox of the dialog.
    @Listen("onCellSelection = #dialog")
    public void onCellSelection(CellSelectionEvent event){
        Textbox rangeBox  = (Textbox)dialog.getFellow("rangeBox");
        Range selection =Ranges.range(event.getSheet(), event.getArea());
        if (selection.isWholeRow()){
            rangeBox.setValue(Ranges.getRowRefString(event.getRow()));
        }else if (selection.isWholeColumn()){
            rangeBox.setValue(Ranges.getColumnRefString(event.getColumn()));
        }else{
            rangeBox.setValue(Ranges.getAreaRefString(event.getSheet(), event.getArea()));
        }
    }
You can find the implementation detail in our example source code.