Use Keikai JSF Tag
Overview
In this section, we will demonstrate how to make other JSF components interact with Keikai in a JSF page using the AJAX tag. We assume that you know some basics about JSF including life cycle, tag usage, event handling, AJAX tag, and managed bean.
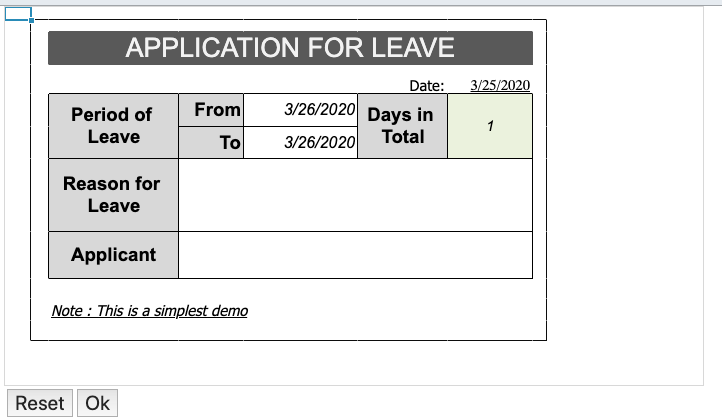
The example application is a simple page to request for leave. A user fills the required field in cells and click “OK” button to submit his request for leave. Or he can clicks “Reset” button to reset what he inputs to default value. The screenshot below shows a request of a user “John”:
Create a JSF Page
Declare Keikai JSF Namespace
Spreadsheet can be embedded in a JSF page in the same way as JSF standard components. First, specify Keikai spreadsheet component namespace URI xmlns:kkjsf="http://www.zkoss.org/jsf/zss" declaration along with other JSF namespace declarations. Then, you can use the tag <zssjsf:spreadsheet/>.
<!DOCTYPE html>
<html xmlns="http://www.w3.org/1999/xhtml"
	xmlns:kkjsf="http://www.zkoss.org/jsf/zss"
	xmlns:f="http://java.sun.com/jsf/core"
	xmlns:h="http://java.sun.com/jsf/html">
Include Required JavaScript Files
Remember to put the head tag to include some required Javascript files.
<h:head>
	<title>Application for Leave</title>
	<kkjsf:head/>
</h:head>
Use Keikai JSF Tag
Since we want to interact with Spreadsheet in JSF AJAX tag, we should also put a <zssjsf:update/> component which is invisible in the browser in on the same page to process ZK AU response. Let’s see the JSF page of our example
application.
app4l.xhtml
1
2
3
4
5
6
7
8
9
10
11
12
13
14
15
16
17
<h:form id="form">
    <kkjsf:spreadsheet id="myzss"
        book="#{applicationForLeave.book}"
        actionBridge="#{applicationForLeave.actionBridge}"
        width="700px" height="380px" maxVisibleRows="11" maxVisibleColumns="9"
        hiderowhead="true" hidecolumnhead="true"/>
    <h:panelGrid columns="3">
        <h:commandButton value="Reset" action="#{applicationForLeave.doReset}" >
            <f:ajax execute="@all" render="msg zkupdate" />
        </h:commandButton>
        <h:commandButton value="Ok" action="#{applicationForLeave.doOk}" >
            <f:ajax execute="@all" render="msg zkupdate" />
        </h:commandButton>
        <h:messages id="msg"/>
    </h:panelGrid>
    <kkjsf:update id="zkupdate"/>
</h:form>
- Line 2: Keikai spreadsheet JSF component tag supports all the properties that are supported by Spreadsheet ZUL component tag.
- Line 3: The
bookattribute is used to bind aio.keikai.api.model.Bookto spreadsheet from a managed bean. - Line 4: The
actionBridgeattribute is only available on Spreadsheet JSF component which is used to set anio.keikai.jsf.ActionBridgeto a managed bean. This object will be explained in next section. - Line 9, 12: We use JSF’s AJAX tag to trigger event handler methods
defined in our managed bean. The component ID in
executeattribute must includekkjsf:spreadsheetID, and here we use@alljust for convenience. Therenderattribute must includekkjsf:updateID. - Line 16: The
updateis another JSF component provided by Keikai which is responsible for processing ZK AJAX response.
Tag attributes
JSF tag supports the same attributes as zul tag, please see Control Components.
Managed Bean
It’s a standard practice to bind a JSF component with a managed bean
which contains data model and business logic. Keikai JSF component
obtains Book object from attribute book and set ActionBridge to a
managed bean’s actionBridge
1
2
3
4
5
6
7
8
9
10
11
12
13
14
15
16
17
18
19
20
21
22
23
24
25
26
27
28
29
@ManagedBean
@RequestScoped
public class ApplicationForLeave {

    // the book of spreadsheet
    private Book book;

     //the bridge to execute action in ZK context
    private ActionBridge actionBridge;
    ...
    public Book getBook() {
        if (book != null) {
            return book;
        }
        try {
            URL bookUrl = FacesContext.getCurrentInstance()
                    .getExternalContext()
                    .getResource("/WEB-INF/books/application_for_leave.xlsx");
            book = Importers.getImporter().imports(bookUrl, "app4leave");
        } catch (Exception e) {
            e.printStackTrace();
            return null;
        }
        initRanges();
        resetFields();
        return book;
    }
...
}
- Line 11: Import a file.
- Line 9: The
actionBridgewill be set by Keikai JSF.
Implement Event Handler Method
In JSF, we can use the syntax below to invoke an event handler method,
doReset(), of a managed bean ( applicationForLeave) in AJAX request.
<h:commandButton value="Reset" action="#{applicationForLeave.doReset}" >
    <f:ajax execute="@all" render="msg zkupdate" />
</h:commandButton>
Because of accessing ZK components like Spreadsheet needs to be in a ZK
execution, we can use ActionBridge to help us. One new ActionBridge
object is provided by Spreadsheet JSF component for each request to a
managed bean via setter. All we have to do is to specify in
actionBridge attribute with a managed bean’s property like:
<zssjsf:spreadsheet id="myzss"
    actionBridge="#{applicationForLeave.actionBridge}"  .../>
Then, we can use this ActionBridge to execute our business logic:
reset and check cells.
Handling Spreadsheet Book Model
Inside ActionBridge.execute(), you can use those APIs we mentioned in
Manipulating Book Model
to implement your business logic. In our example, we use io.keikai.api.Range to set cell edit text and get value from cells.
doReset()
The usage of ActionBridge is to call its execute() with an io.keikai.jsf.Action object and
we implement our business logic in Action’s execute() method with Range APIs mentioned.
In “reset cells” case, we use Range to clear cell text.
public void doReset() {
    //use actionBridge to execute the action inside ZK context
    //so the spreadsheet can get the update of book automatically
    actionBridge.execute(new Action() {
        public void execute() {
            initRanges();
            resetFields();
        }
    });
    addMessage("Reset book");
}
...
private void resetFields() {
    // use range API to set the cell data
    fromCell.getCellData().setValue(getDate(LocalDate.now().plusDays(1))); //tomorrow
    toCell.getCellData().setValue(getDate(LocalDate.now().plusDays(1)));
    reasonCell.setCellEditText("");
    applicantCell.setCellEditText("");
    requestDateCell.getCellData().setValue(getDate(LocalDate.now()));
}
Then ActionBridge will response corresponding update script to update the keikai in app4l.xhtml.
doOK()
The same rule applies to “doOK()” method, and we just list codes of Action for your reference.
public void doOk() {
    actionBridge.execute(new Action() {
        public void execute() {
            initRanges();
            Date from = fromCell.getCellData().getDateValue();
            Date to = toCell.getCellData().getDateValue();
            String reason = reasonCell.getCellData().getStringValue();
            Double total = totalCell.getCellData().getDoubleValue();
            String applicant = applicantCell.getCellData().getStringValue();
            Date requestDate = requestDateCell.getCellData().getDateValue();

            if (!validateInput(from, to, reason, total, applicant, requestDate)){
                return;
            }

            //Handle your business logic here
            addMessage("Your request are sent, following is your data");
            addMessage("From :" + from);
            addMessage("To :" + to);
            addMessage("Reason :" + reason);
            addMessage("Total :" + total.intValue());//we only need int
            addMessage("Applicant :" + applicant);
            addMessage("RequestDate :" + requestDate.getTime());

            exportXlsx();
        }
    });
}
Complete Source Code
Source code of above example application can be accessed in the example project