Control Component
Overview
There are 2 ways to control a Keikai spreadsheet component:
-
zul attributes - static
It’s written in an XML-format file. -
calling API in a Controller - dynamic
You can create a Java controller to control Keikai dynamically by its API at the run-time.
ZUL Attributes
Each ZK component is represented by a unique tag name, e.g. <spreadsheet> stands for Keikai Spreadsheet in a ZUL page. The easiest way to control a component is to specify a value at the tag’s attribute in a zul.
Excel File Path
The simplest way to load and display an Excel file is setting src attribute with the file path which is a relative URI with respect to the web context root.
<spreadsheet src="/myfile.xlsx" .../>
<spreadsheet src="/WEB-INF/myfile2.xlsx" .../>
- In this case,
myfile.xlsxis under the web context root folder. - Since Keikai runs at server-side, it can access
/WEB-INF.
Toolbar
The showToolbar attribute controls toolbar’s visibility, and it only accepts boolean string.
Default: false
<spreadsheet showToolbar="true"/>
Formula Bar
The showToolbar attribute controls formula bar’s visibility, and it only accepts boolean values.
Default: false
<spreadsheet showFormulabar="true"/>
Context Menu
When a user right click on a cell, Keikai pops up a context menu. The showContextMenu attribute controls context menu’s visibility, and it only accepts boolean values.
Default: false
<spreadsheet showContextMenu="true"/>
Sheet Tab
The showSheetbar attribute controls sheet bar’s visibility, and it only accepts boolean values.
Default: false
<spreadsheet showSheetbar="true"/>
Sheet Tab Context Menu
When a user right click on a sheet tab, Keikai pops up a context menu that shows sheet operations e.g. hide or move.
The showSheetTabContextMenu attribute controls the context menu’s visibility, and it only accepts boolean values.
Default: false
<spreadsheet showSheetTabContextMenu="true"/>
Selection Visibility
Default: true
When it’s true, Keikai keeps the selection area visible after opening a
dialog like “Format Cell”. Specify false to turn off this behavior.
<spreadsheet keepCellSelection="false" .../>
If you want to change the default value to false globally; you can do that by
setting the library property io.keikai.ui.keepCellSelection to
false. Read more here
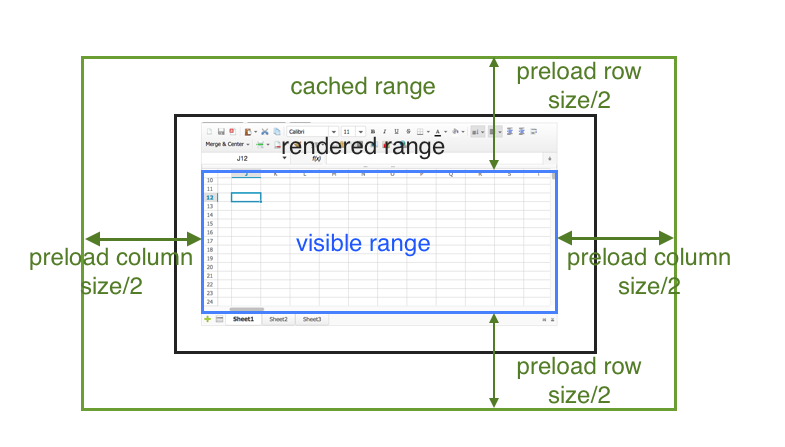
Preloaded Column / Row Size
In order to speed up cell rendering, Keikai spreadsheet caches a range of
cell data at client-side to avoid constantly getting data from the server-side when
scrolling. You can adjust this range by preloadColumnSize (default:
40) and preloadRowSize (default: 60) like:
<spreadsheet preloadColumnSize="50" preloadRowSize="50"/>
If you specify a larger size, it will make a more smooth scrolling when moving to adjacent cells. On the other hand, when you scroll out of the cached range, it takes more time for Keikai to get the next data batch from the server.
Pasting Lots of Cells Requires Larger Preloaded Size
If you paste lots of cells from Excel which is more than cached range, Keikai will fail to handle the pasting because it does not have corresponding cached cell data at the client-side (you should see an error message in the developer tool / Console tab). If you run into this issue, you should increase preloaded row/column size according to the expected row/column size for copy-pasting.
Underlying Details
There are 3 ranges behind the scene:
-
visible range: the viewport that shows a sheet. By default it is 40 column * 50 rows. It changes if you resize a browser window, or scrolls the page, etc.
-
rendered range: the range with rendered DOM of cells. Spreadsheet could also render hidden rows if the next visible row is within the range, e.g. if row 25th~30th are hidden, but row 31st is in the range, then Spreadsheet still renders row 25th~30th but hides them.
-
cached range: the browser cached cell data.
When the visible range moves by user scrolling, Keikai renders DOM of cells
from the cached range. So the rendered range becomes larger. If the cache does
not cover the whole visible range, Keikai will send AU request
(onZssFetchActiveRange) to get the data back to the cache.
maxRenderedCellSize
It’s a threshold to remove cached cell data when scrolling. When you
scroll toward one direction, Spreadsheet will remove cached cell data in
reversed direction. For example, if you scroll toward right (east), it
will remove those cached cells data of the left (west) which are over
the maxRenderedCellSize inside the “cached range” but outside of the
“visible range”.
maxVisibleColumns
Default: >=40
By default, if you don’t specify a value for this attribute, Keikai will detect the sheet content and show as more columns as needed. However, it will show at least 40 columns if you have a smaller sheet.
The attribute maxVisibleColumns controls the maximum visible number of columns in a Spreadsheet, it must be larger than 0. For example, if you set it to 40, it will display 40 columns: column A to column AN.
maxVisibleRows
Default: >=200
By default, if you don’t specify a value for this attribute, Keikai will detect the sheet content and show as more rows as needed. However, it will show at least 200 rows if you have a smaller sheet.
This attribute controls the maximum visible number of rows in Spreadsheet. You can use these 2 attributes above to set up the visible area, and it takes effect on all sheets.
Max Visible Rows/Columns Per Sheet
If you want to set max visible rows/columns different for each sheet, you cannot specify maxVisibleRows and maxVisibleColumns.
Then you need to set max visible rows/columns for each sheet with the methods below:
    spreadsheet.setSheetMaxVisibleColumns(spreadsheet.getSelectedSSheet(), 10);
    spreadsheet.setSheetMaxVisibleRows(spreadsheet.getSelectedSSheet(), 100);
columntitles, rowtitles
Allow you to set custom column/row heading instead of showing A,B,C or 1,2,3.
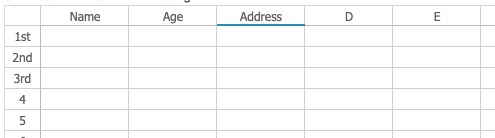
<spreadsheet columntitles="Name, Age, Address" rowtitles="1st, 2nd, 3rd"/>
readOnly
since 5.6.0
Default: false
Set this attribute to true to make a spreadsheet component read-only. All UI are disabled including the buttons on the toolbar and the context menu on the sheet tab. Users can’t select any cell but view sheet content and switch among sheets.
<spreadsheet readOnly="true"/>
Different Scope from Protection
You can also make a sheet read-only by enabling the sheet protection (via UI or API), but it affects the whole book instead of a spreadsheet component. That means you affects every user who is accessing the same Book under collaboration mode. Hence, assuming you want some users to edit a book and some just view the content made by others, you should apply readOnly="true" on those view-only users.
Other Inherited Properties
There are other properties inherited from parent component you can set,
such as width, or height. For the complete list, please look for
those inherited setter methods in the JavaDoc io.keikai.ui.Spreadsheet.
Each setter means a corresponding attribute, for example:
setWidth()
<spreadsheet width="100%">
setHeight()
<spreadsheet height="100%">
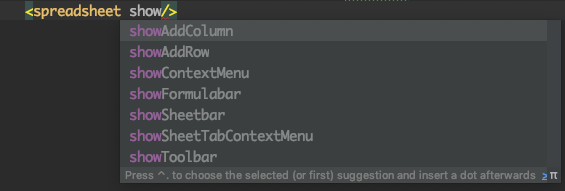
IDE Code Completion / Content Assist
You can enable code completion of your IDE and put the schema declaration below to help you write spreadsheet attributes in a zul.
<zk xmlns="http://www.zkoss.org/2005/zul"
        xmlns:xsi="http://www.w3.org/2001/XMLSchema-instance"
        xsi:schemaLocation="http://www.zkoss.org/2005/zul http://keikai.io/2019/zul/zul.xsd">
</zk>
IntelliJ IDEA
After apply the schema, click the line of schemaLocation. IntelliJ IDEA will show a yellow bulb and you can click it to fetch external resource.
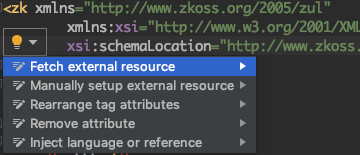
Then IntelliJ will download the XSD file and assist you to complete a word when you type an attribute.
MVC in Brief
Keikai is based on ZK Framework that supports the MVC design pattern to develop a web application. This pattern divides an application into 3 parts: Model, View, and Controller. The Model is the data that an application handles. The View is the UI which indicates a ZUL page in a ZK-based application. The Controller handles events from the UI, controls the UI, and accesses the Model. You need to know the basic of MVC pattern to control a spreadsheet, please read Get ZK Up and Running with MVC.
View
You can write a zul to build UI first like:
<zk xmlns="http://www.zkoss.org/2005/zul"
    xmlns:xsi="http://www.w3.org/2001/XMLSchema-instance"
    xsi:schemaLocation="http://www.zkoss.org/2005/zul http://keikai.io/2019/zul/zul.xsd">
    <spreadsheet id="ss" height="100%" width="100%" src="/WEB-INF/books/demo_sample.xlsx"
                 showContextMenu="true" showToolbar="true" showSheetbar="true" showSheetTabContextMenu="true" showFormulabar="true"/>
</zk>
- Line 1: declare the schema can give you content assist when writing spreadsheet xml in an IDE like IntelliJ IDEA.
- One tag represents one component, and you can configure its features and behavior with tag attributes.
Then visit the zul with your browser.
Controller
After you create a ZUL page, you can apply a Controller to handle events
and control a spreadsheet. The simplest way to create a
Controller is to create a class that extends org.zkoss.zk.ui.select.SelectorComposer. For
details, please refer to ZK Developer’s Reference/MVC/Controller.
Controller example
public class MyComposer extends SelectorComposer<Component> {
    //omitted codes...
}
Then you can apply this controller to a root component of a ZUL page.
index.zul
1
2
3
4
    <window title="My First Keikai spreadsheet Application"
    apply="io.keikai.essential.MyComposer">
        <spreadsheet id="ss" src="/WEB-INF/books/demo_sample.xlsx" .../>
    </window>
- Line 2: We usually apply a controller on the root component (the outermost component) of a ZUL page, so that we can control of all components under the root.
- Line 4: The component’s id,
ss, can be used as a criteria in component selector to get Spreadsheet object in a controller, and we will describe it in next section.
Access Components in a ZUL Page
After applying the controller, you can easily get a component object in the zul with the help of SelectorComposer and manipulate the component to fulfill our business requirements. Don’t call new statement to get a component object since ZK manages the life cycle of components of a zul.
Steps to get a component:
- Declare a member variable with the same type as the component you wish to get.
- Apply the annotation
@Wirewith component selector syntax which specifies matching criteria against the components of the page which is applied with this controller.
When a ZUL page is applied with a controller, ZK will wire
corresponding components object to those variables annotated with
@Wire according to component selector.
If you wish to initialize components in a Controller, you should
override doAfterCompose(). For complete explanation, please refer to
ZK Developer%27s Reference/MVC/Controller/Wire
Components.
Let’s see an example to get Spreadsheet component in index.zul:
@Wire usage
1
2
3
4
5
6
7
8
9
10
11
12
public class MyComposer extends SelectorComposer<Component> {

    @Wire
    Spreadsheet ss;

    @Override
    public void doAfterCompose(Component comp) throws Exception {
        super.doAfterCompose(comp);  //wire variables and event listeners
        //access components after calling super.doAfterCompose()
    }

}
- Line 3,4: If you specify nothing in
@Wire, ZK will use the variable name as a component’s id to look for matching component in the ZUL page. In this case, ZK will try to find a Spreadsheet component whose id isss. - Line 7: Override this method to write initializing code in it.
- Line 8: Remember to call
super.doAfterCompose()before you access components because parent class wires the components for you.
Set Spreadsheet Properties by API
After you retrieve a reference to a component, you can use its API to manipulate a component. The basic usage is to set (or get) a component’s
properties. Each Spreadsheet’s property listed in previous section has a
corresponding getter and setter. For example,setShowToolbar() and isShowToolbar() corresponds to the attribute
showToolbar. You can read Javadoc for the complete list of getter and setter.
Setter usage
1
2
3
4
5
6
7
8
9
10
11
12
13
14
15
16
public class MyComposer extends SelectorComposer<Component> {

    @Wire
    Spreadsheet ss;

    @Override
    public void doAfterCompose(Component comp) throws Exception {
        super.doAfterCompose(comp);  //wire components and event listeners
        //access components after calling super.doAfterCompose()
        if (isConditionOne()){
            ss.setShowToolbar(true);
            ss.setSrc("/books/firstFile.xlsx");
        }
    }

}
- Line 11,12: Using API allows you to set a component dynamically upon different conditions.
Handling Events
In most scenarios, the controller is usually used to listen to interested events of Spreadsheet and implement business logic to react to the events. When a user interacts with a Spreadsheet, it will send various events according to his actions. Please refer to Handling Events on how you can listen events in a controller. To implement business logic, you definitely will need to access Spreadsheet data model. Refer to sections under Manipulating Book Model to know how to use it.