Work with Database
One common use case is to load spreadsheet data from your database and save it back after editing. There are 2 ways to interact with a database:
- Import/Export an xlsx file from/to your database:
Import: please reference the previous section Online Editor where you can import xlsx file via the API.
Export: All information of a book model can be exported to an .xlsx file. You can store the file in a BLOB field of a table in a database. - Populate/Store cell data from/to your database:
Populate data into spreadsheet: When displaying data from the database, you can publish data withRangesetter methods into Keikai cells.
Store data into database: Extract cell data or formulas you need withRangegetter method and insert them into a corresponding database table.
The example we introduce below demonstrates the 2nd way: using Range API to save the cell data back to the database and publish a table’s data to cells. The architecture is as follows:

Range API
For each cell/row/column operation via API, you need to get a Range object first. It could represent one or more cells, a row, a column, a sheet, or a book. Just like you need to select a cell with your mouse in a sheet.
The helper class Ranges supports various methods to create a Range object like:
// a book
Ranges.range(spreadsheet.getBook());
// a sheet
Ranges.range(spreadsheet.getSelectedSheet());
// a row
Ranges.range(spreadsheet.getSelectedSheet(), "A1").toRowRange();
// a cell
Ranges.range(spreadsheet.getSelectedSheet(),  3, 3);
// multiple cells
Ranges.range(spreadsheet.getSelectedSheet(), "A1:B4");
Ranges.range(spreadsheet.getSelectedSheet(), 0, 0, 3, 1);
Getting a Range for one cell requires a sheet, row index, and column index as the coordinate, and multiple cells requires starting and end row/column index.
With all these information, you can call Range’s method to performe an action like setValue() or getValue().
Background
Assume you wish to display a database table in a predefined format. This can be done by preparing an Excel template, load the template into Keikai, and then populate the data from database to the template.
Refer to the following screenshot, on the right hand side there is a database table. On the left hand side, it’s Keikai that loads the data from the table into an xlsx template:
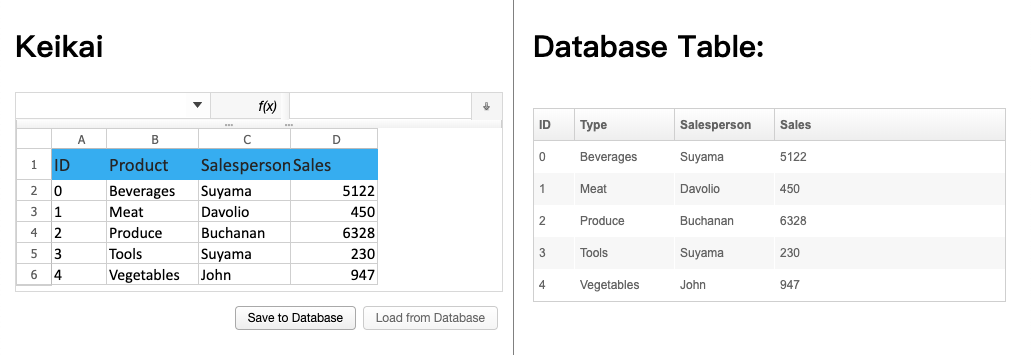
An end user can:
- edit cells and save back to the database
- reload the data from the database
Persistence Layer Classes
To make thing easy to understand, we create a class MyDataService to handle query and update for the (simulated) database. It can query a collection of Trade for us to populate into Keikai and save Trade into the database.
In your real application, you can implement your own persistence layer classes according to your preference. There’s no limitation here, you can use Hibernate or JDBC or any Java solutions you like.
Build the UI
We build the page above in (database.zul) with various ZK components, please refer to ZK Component Refrence to know its details.
Controller
Keikai supports the well-known pattern, MVC (Model-View-Controller), and it plays as the role of View. The domain data from the database is referred to as Model. We have to create a Controller to control Keikai. The controller for Keikai is a Java class that extends SelectorComposer, and it interacts with the database via MyDataService.
1
2
3
4
5
6
7
public class DatabaseComposer extends SelectorComposer<Component> {

    private MyDataService dataService = new MyDataService();
    @Wire
    private Spreadsheet ss;
 ...
}
- line 4: With
@Wireon a member field, the underlying ZK framework can injectSpreadsheetobject created according to the zul. You don’t need to create it by yourself.
Apply on the page
We need to link DatabaseComposer with the previous page, so that the controller can listen to events and controll components via API.
Specify the full-qualified class name at apply attribute, then Keikai will instatiate it automaticaly when you visit the page. The controller can contoller the root component, <hlayout>, and all its children components (those inner tags).
<hlayout width="100%" vflex="1" apply="io.keikai.tutorial.database.DatabaseComposer">
...
    <spreadsheet />
<hlayout>
Listen Events
There are 2 buttons on the page that we need to listen to their click event and implement related application logic. Specify 2 buttons’ id so that you can easily listen to events of them.
<button id="save" label="Save to Database" />
<button id="load" label="Load from Database" disabled="true"/>
Put @Listen on your event listener method with CSS selector-like syntax below. That means you want to listen onClick event on #load which represents a component whose ID is load. For more syntax, please refer to SelectorComposer javadoc. Therefore, when a user clicks “Load from Database” button, DatabaseComposer::load() will be invoked.
//Load from Database
@Listen("onClick = #load")
public void load(){
    reload();
    ...
}

//Save to Database
@Listen("onClick = #save")
public void save(){
    dataService.save(modifiedTrades);
    ...
}
Then, you can implement related application logic in each listener according to your requirements.
Populate Data into Cells
After you query one or more Trade from the database, you can populate it into the target cells with Range setter:
//column index
public static int ID = 0;
public static int TYPE = 1;
public static int SALESPERSON = 2;
public static int SALES = 3;
...
private void load(Trade trade, int row) {
    Sheet sheet = ss.getSelectedSheet();
    Ranges.range(sheet, row, ID).setCellValue(trade.getId());
    Ranges.range(sheet, row, TYPE).setCellValue(trade.getType());
    Ranges.range(sheet, row, SALESPERSON).setCellValue(trade.getSalesPerson());
    Ranges.range(sheet, row, SALES).setCellValue(trade.getSale());
}
Save Data into a Table
Before you save a Trade, you need to extract user input from cells with getter. You still need a Range but you will call getter this time like:
1
2
3
4
5
6
7
8
9
10
11
12
13
private Trade extract(int row ){
    Sheet sheet = ss.getSelectedSheet();
    Trade trade = new Trade(extractInt(Ranges.range(sheet, row, ID)));
    trade.setType(Ranges.range(sheet, row, TYPE).getCellEditText());
    trade.setSalesPerson(Ranges.range(sheet, row, SALESPERSON).getCellEditText());
    trade.setSale(extractInt(Ranges.range(sheet, row, SALES)));
    return trade;
}

private int extractInt(Range cell){
    CellData cellData = cell.getCellData();
    return cellData.getDoubleValue() == null ? 0 : cellData.getDoubleValue().intValue();
}
- line 12: Beware - if a cell is blank,
CellData::getDoubleValue()returns null.